How Python Helped Select My New Home — Part 2
In Part 1, I shared how Python can be used to automate the mundane processes in my BTO application such as keeping track of the availability of units and notifying me whenever units were taken up. As of today, it is currently serving ~700 users 🎉 Big thanks to all for your support!
As it began to free up my time from monitoring units, I was able to spend more time comparing the units and deciding how to rank them. Along the way, I realised I had to manually compute the ‘factors’ (e.g. type of sun a unit gets, window direction) of each unit before I could compare them. This was both repetitive and time-consuming. Having to analyse the site plan to craft the factors and identify which were the ‘ideal’ units out of hundreds of them could have potentially taken up a couple of days.
Don’t get me wrong, this was definitely one of the milestones I treasure. However, I believe that churning of factors for each unit could be instantaneous and more time could be spent choosing the units with your partner instead. Therefore, in this article, I will be sharing how Python and a little bit of computer vision did just that for me.
Oh, in case you’re unfamiliar with BTO:
Build-To-Order (BTO) is a public housing flat allocation system in Singapore whereby singles (age 35 and above) and couples can ballot for a new flat. The flat will usually be ready for collection between 3–5 years time, varies between projects. Occasionally known as the Great Singapore Lucky Draw.
Explaining The Process
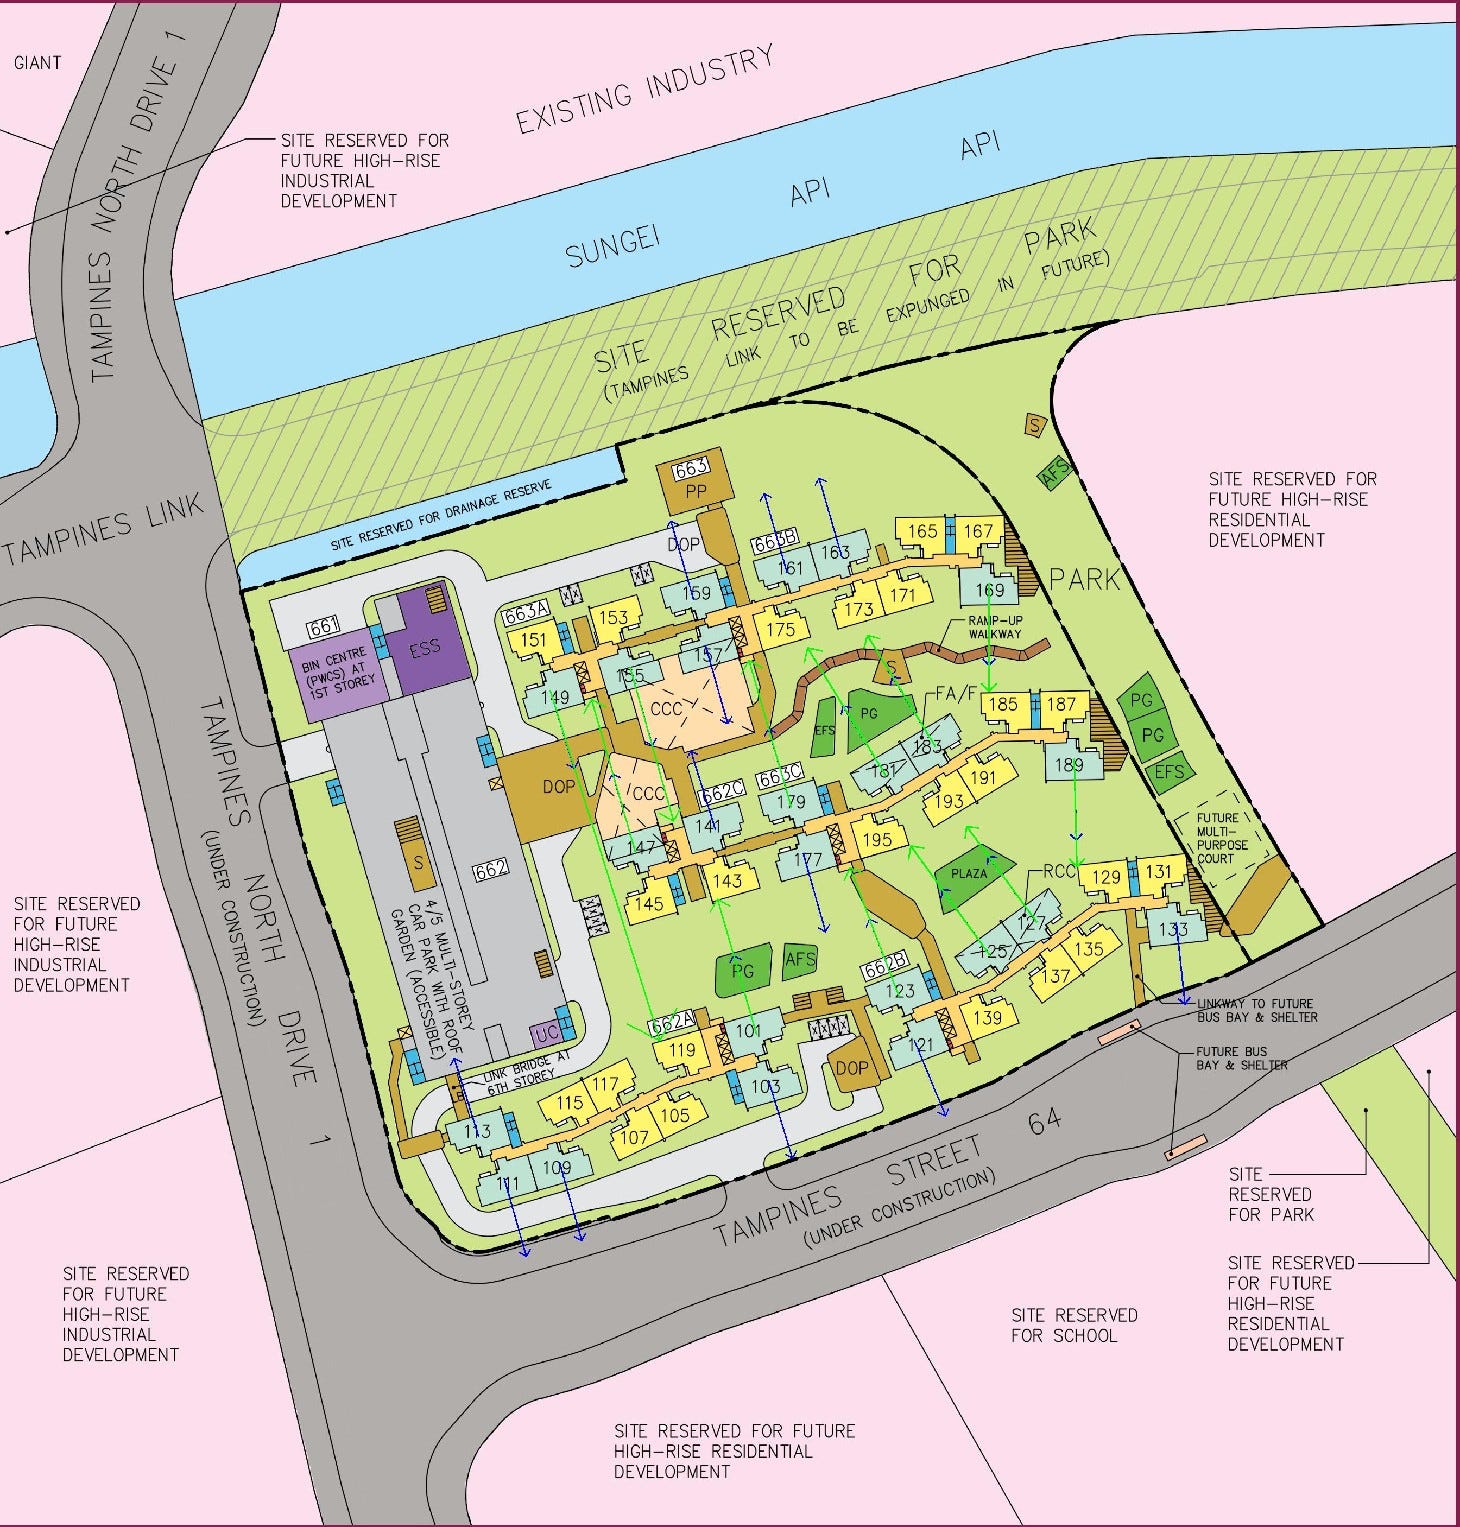
To give you a better idea, allow me to walk you through the process. Imagine you got really lucky in your application for a 5-Room in Tampines and were given a queue number 10. This means that you will be the 10th person to choose a unit, likely one with favorable factors. You are then given a site plan of the project to help with your decision making process:
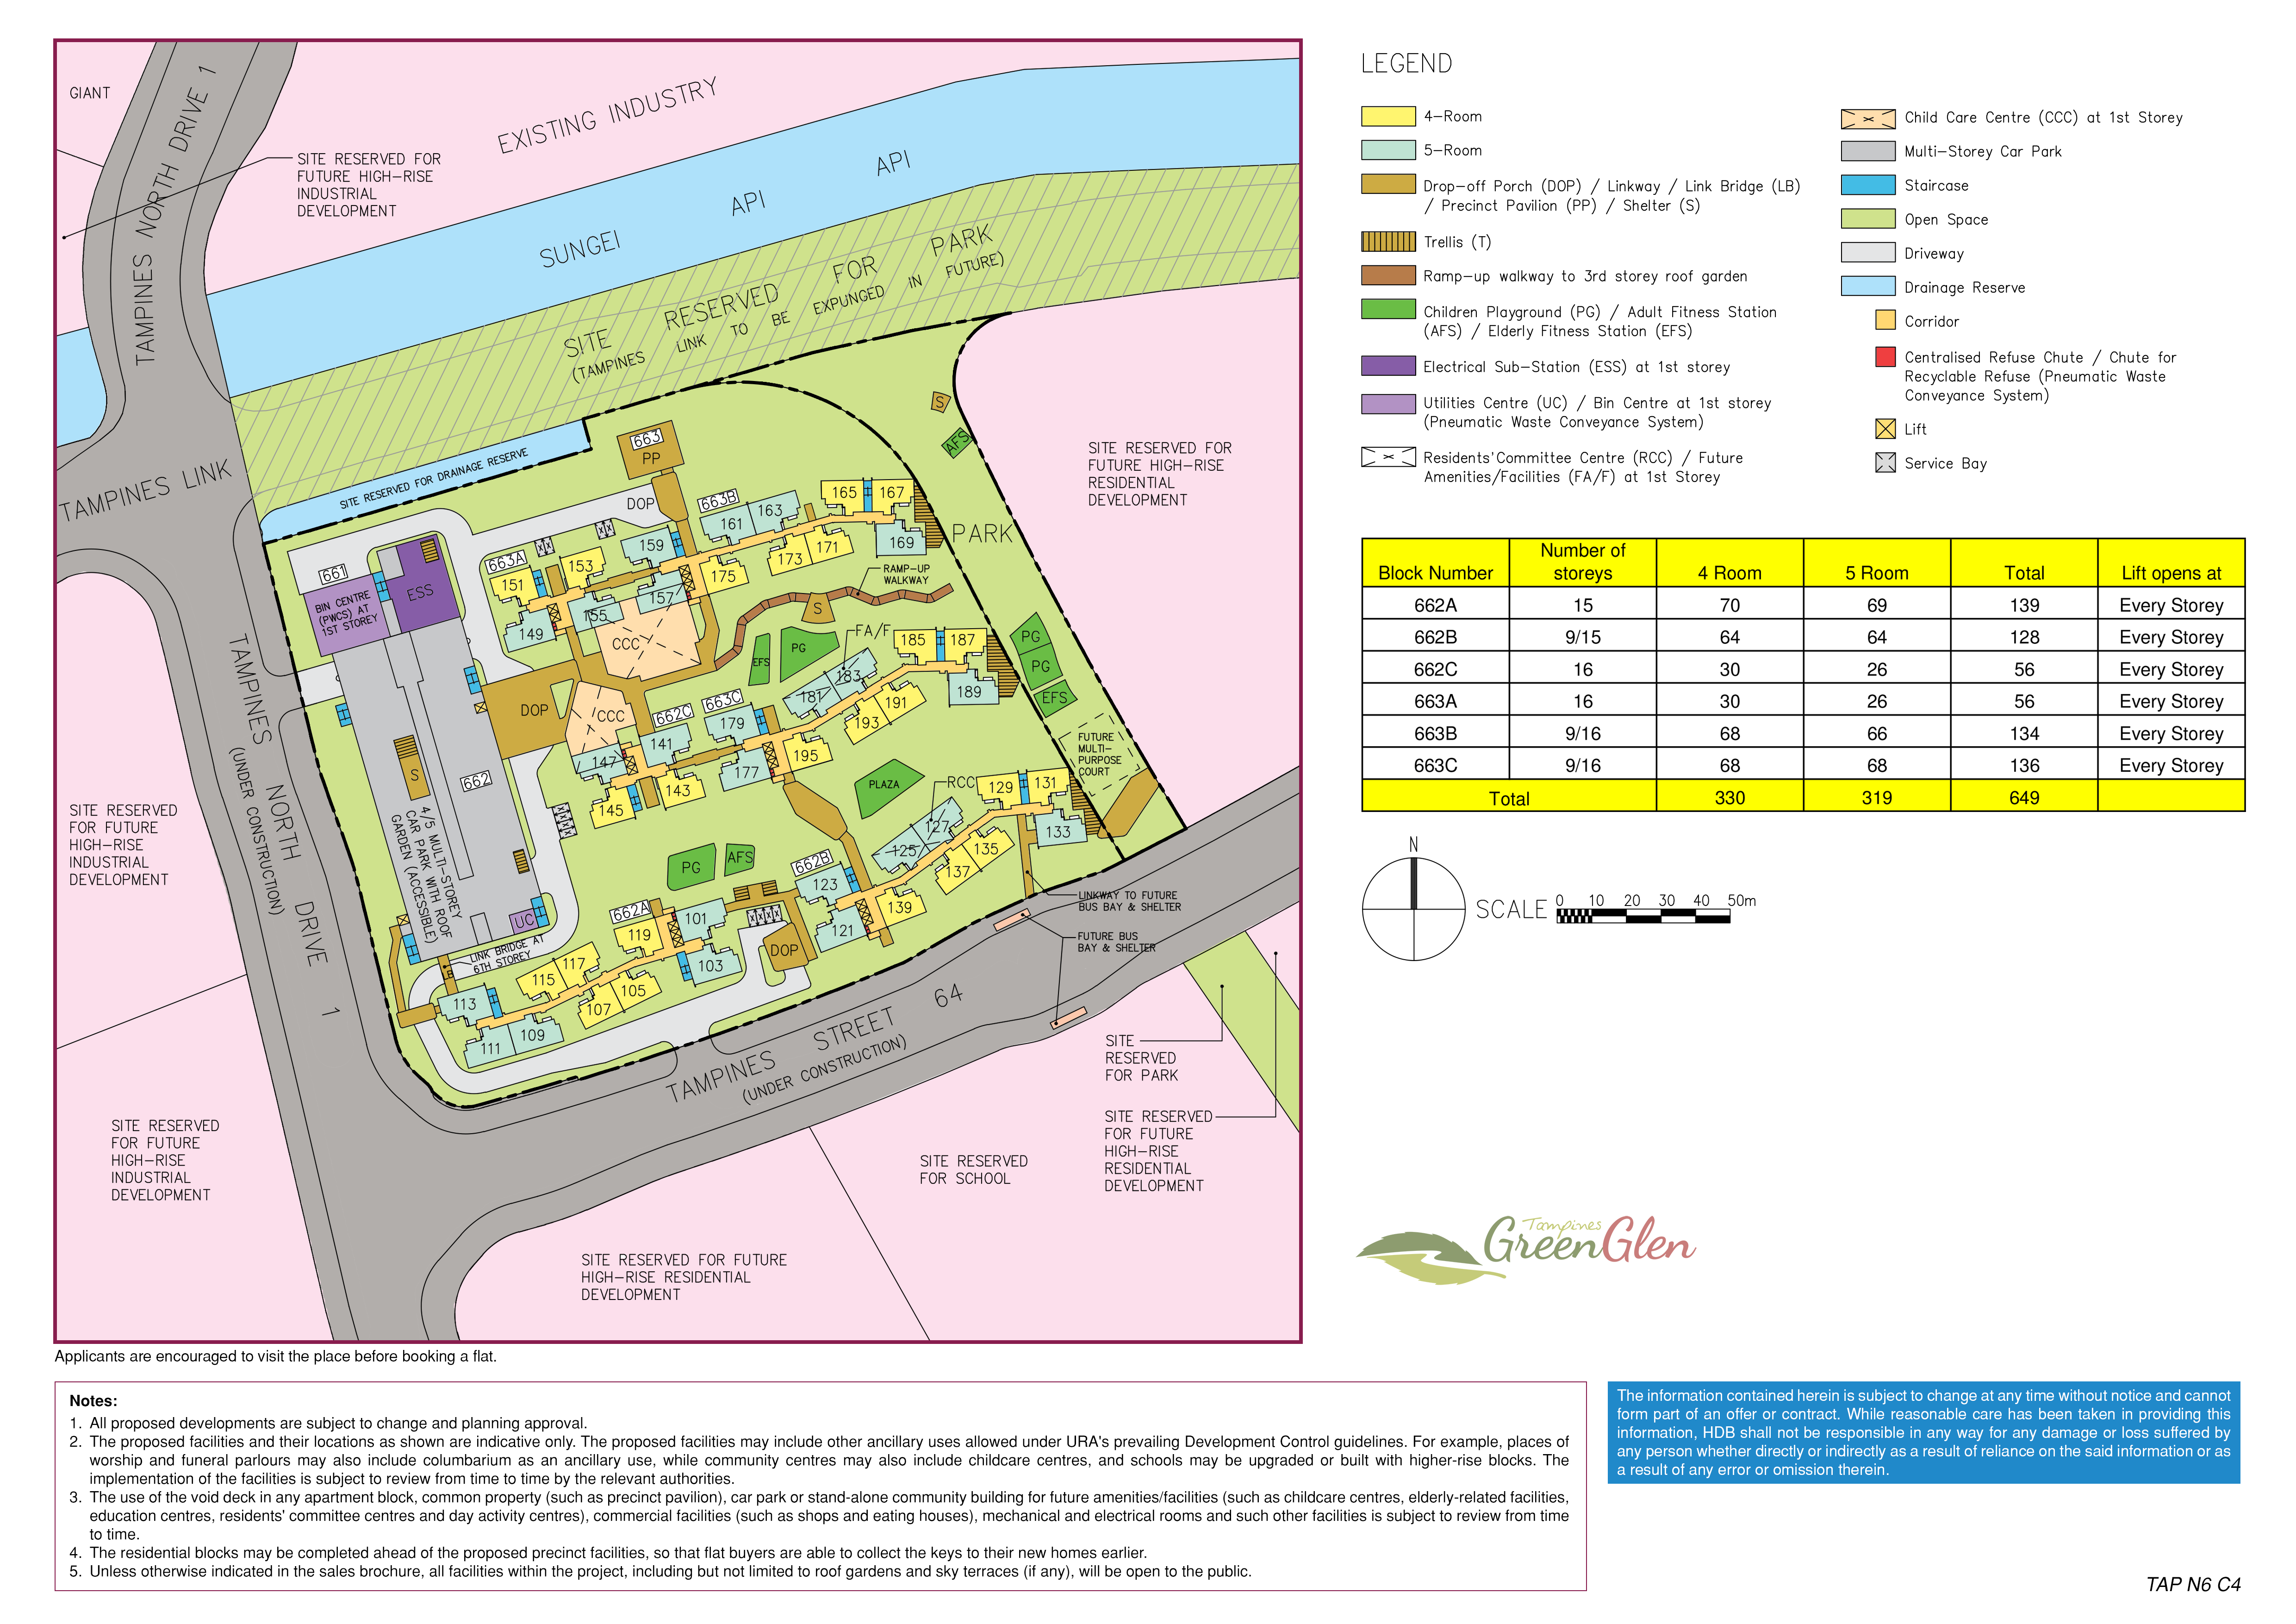
Site Plan of Tampines Green Glen. Photo by HDB
Let’s assume that you are profit-motivated and want to maximize the future resale value of your unit. You decided that you would like to select a unit based on the following factors:
- No direct sun shining into your windows — for cooler temperature
- Unblocked view out of your bedroom — who doesn’t like a good view
- Located on a high floor — up, up and away from the noise
Note: These factors are just a subset of the many factors out there. Other examples are distance to train station, distance to school and even fengshui-related attributes.
Although the importance of each factor varies across individuals, its underlying computation remains similar. Hopefully, you’re starting to understand how much of a hassle this can be. Keeping the aforementioned factors in mind, we can now convert them into a Python program.
Converting The Process to Code
Here’s a breakdown of what we need to achieve in code:
- Identify where the 5-room units are in the site plan.
- For each unit, determine which side the windows are located on.
- For each unit, determine which direction the windows are facing.
The above provides us with a spatial understanding of each unit, forming the foundation of our objective. After all, the majority of the factors are based on a unit’s positioning.
Implementation
Before we begin, you will have to understand a little bit about the basics of how computers perceive images. This will be helpful for you to understand my approach.
Image as an array. Photo by Stanford
Unlike humans, computers see images as numbers in a 3-dimensional array, i.e. width x height x channels.
- Each number represents the intensity of the pixel, ranging from 0 (darkest) to 255 (brightest).
- For a color image, there are 3 channels (red, green and blue) and for a grayscale image, there is only 1 channel.
- The x,y-axis is used to reference to a certain pixel and interestingly, the point of origin [0,0] is the top left pixel of the image.
In Python, there are several packages we can use to handle images, such as OpenCV, Pillow and Scikit-Image. In my case, we will be using mainly OpenCV.
With this fresh knowledge, let’s go back to our first objective:
Identify where the 5-room units are in the site plan.
In order to determine their positions, one technique we can utilize is color segmentation. Notice how the 5-room units are color-coded in teal and that is also shown in the legend. This means that if we are able to obtain the exact values of the color, we can find where the units are in our 3-D array.
By using a color picker, we can determine the teal to be of values 191, 227, 211 (R,G,B). Now let’s color segment our image:
color = [211, 227, 191]
# Convert our image from BGR to HSV
hsv_img = cv2.cvtColor(img, cv2.COLOR_BGR2HSV)
limit = np.uint8([[color]])
# Convert our color of choice to HSV as well
limit = cv2.cvtColor(limit,cv2.COLOR_BGR2HSV)[0][0]
mask = cv2.inRange(hsv_img, limit, limit)
# Filter for the colour
res = cv2.bitwise_and(img,img, mask= mask)
We have to swap the values of our color around to become BGR and convert it into HSV (Hue, Saturation, Lightness). HSV is another form of representation for colors. The resulting image from our color segmentation will look like:
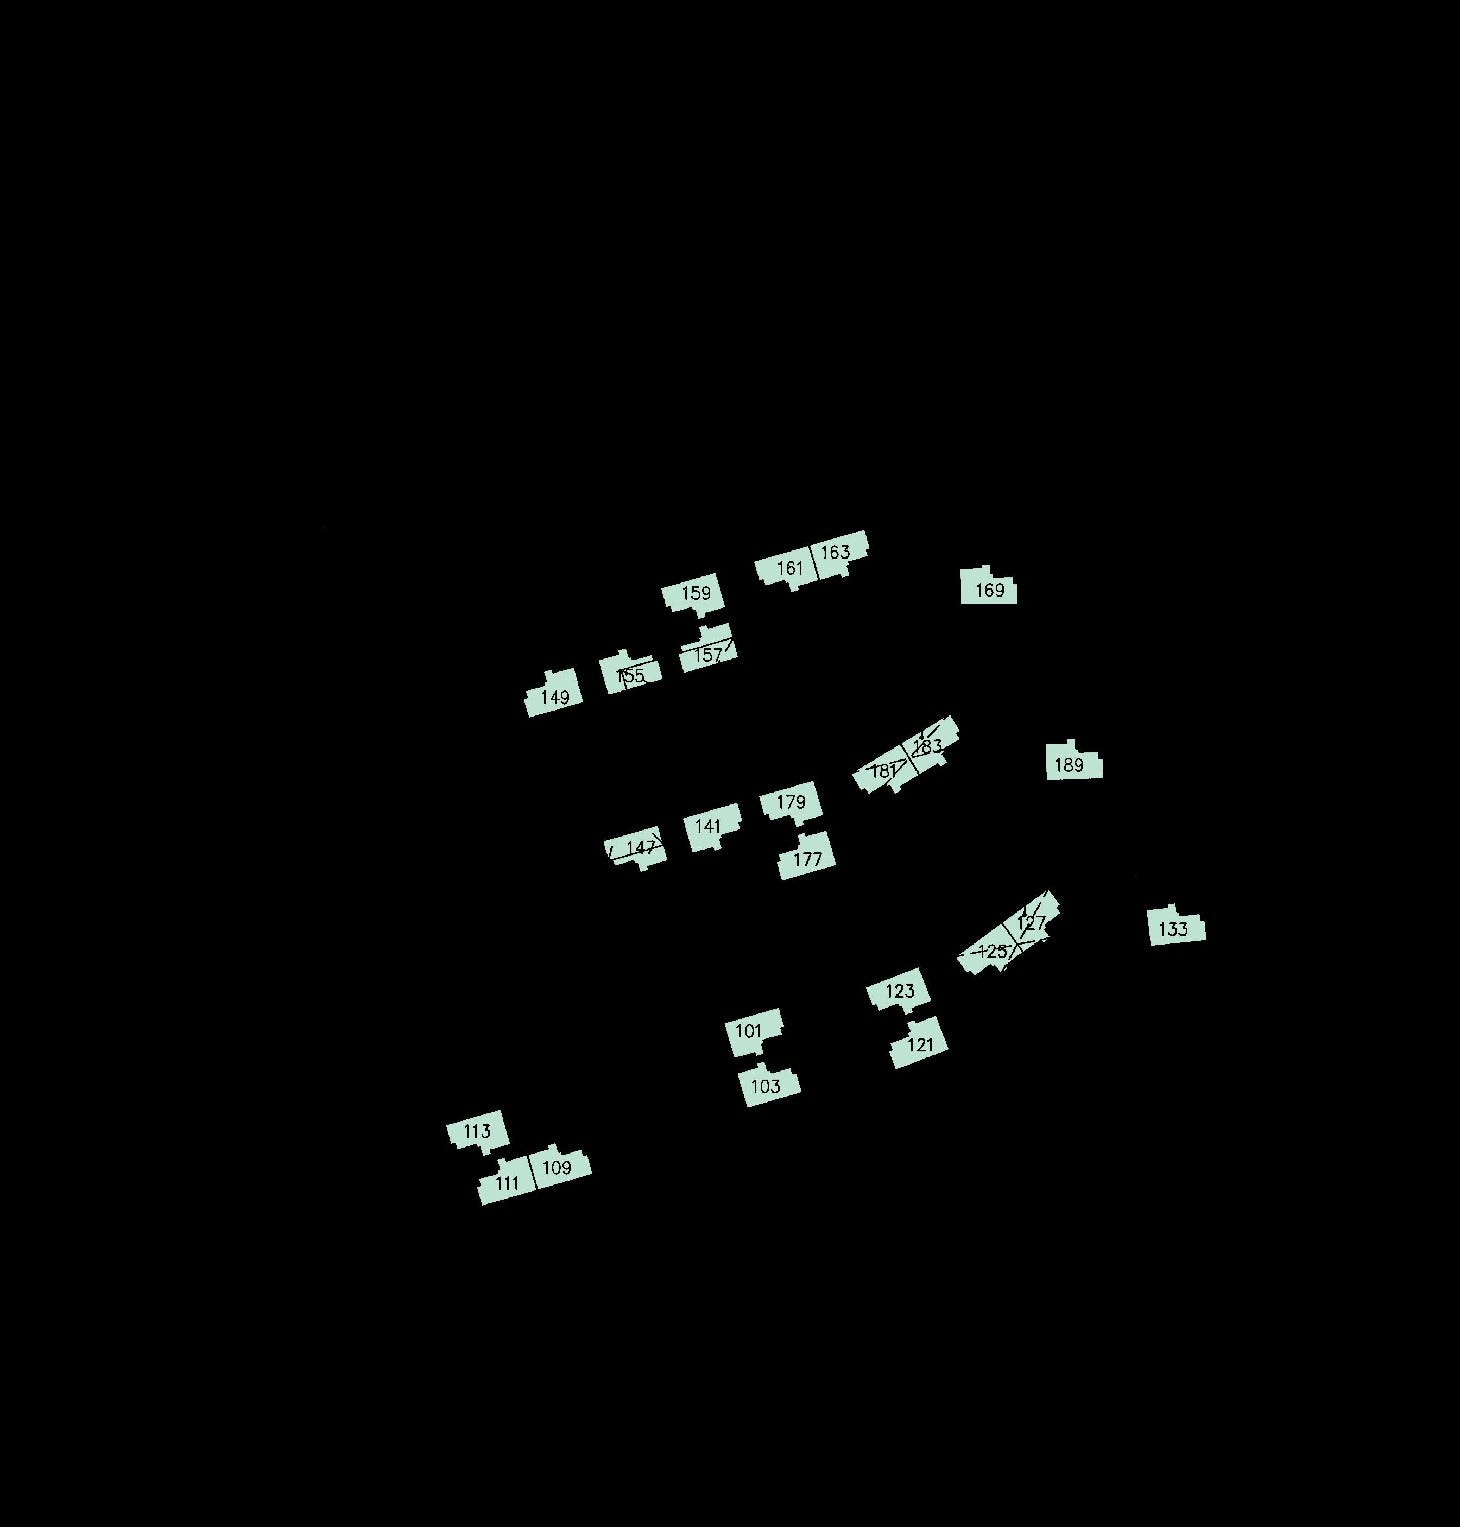
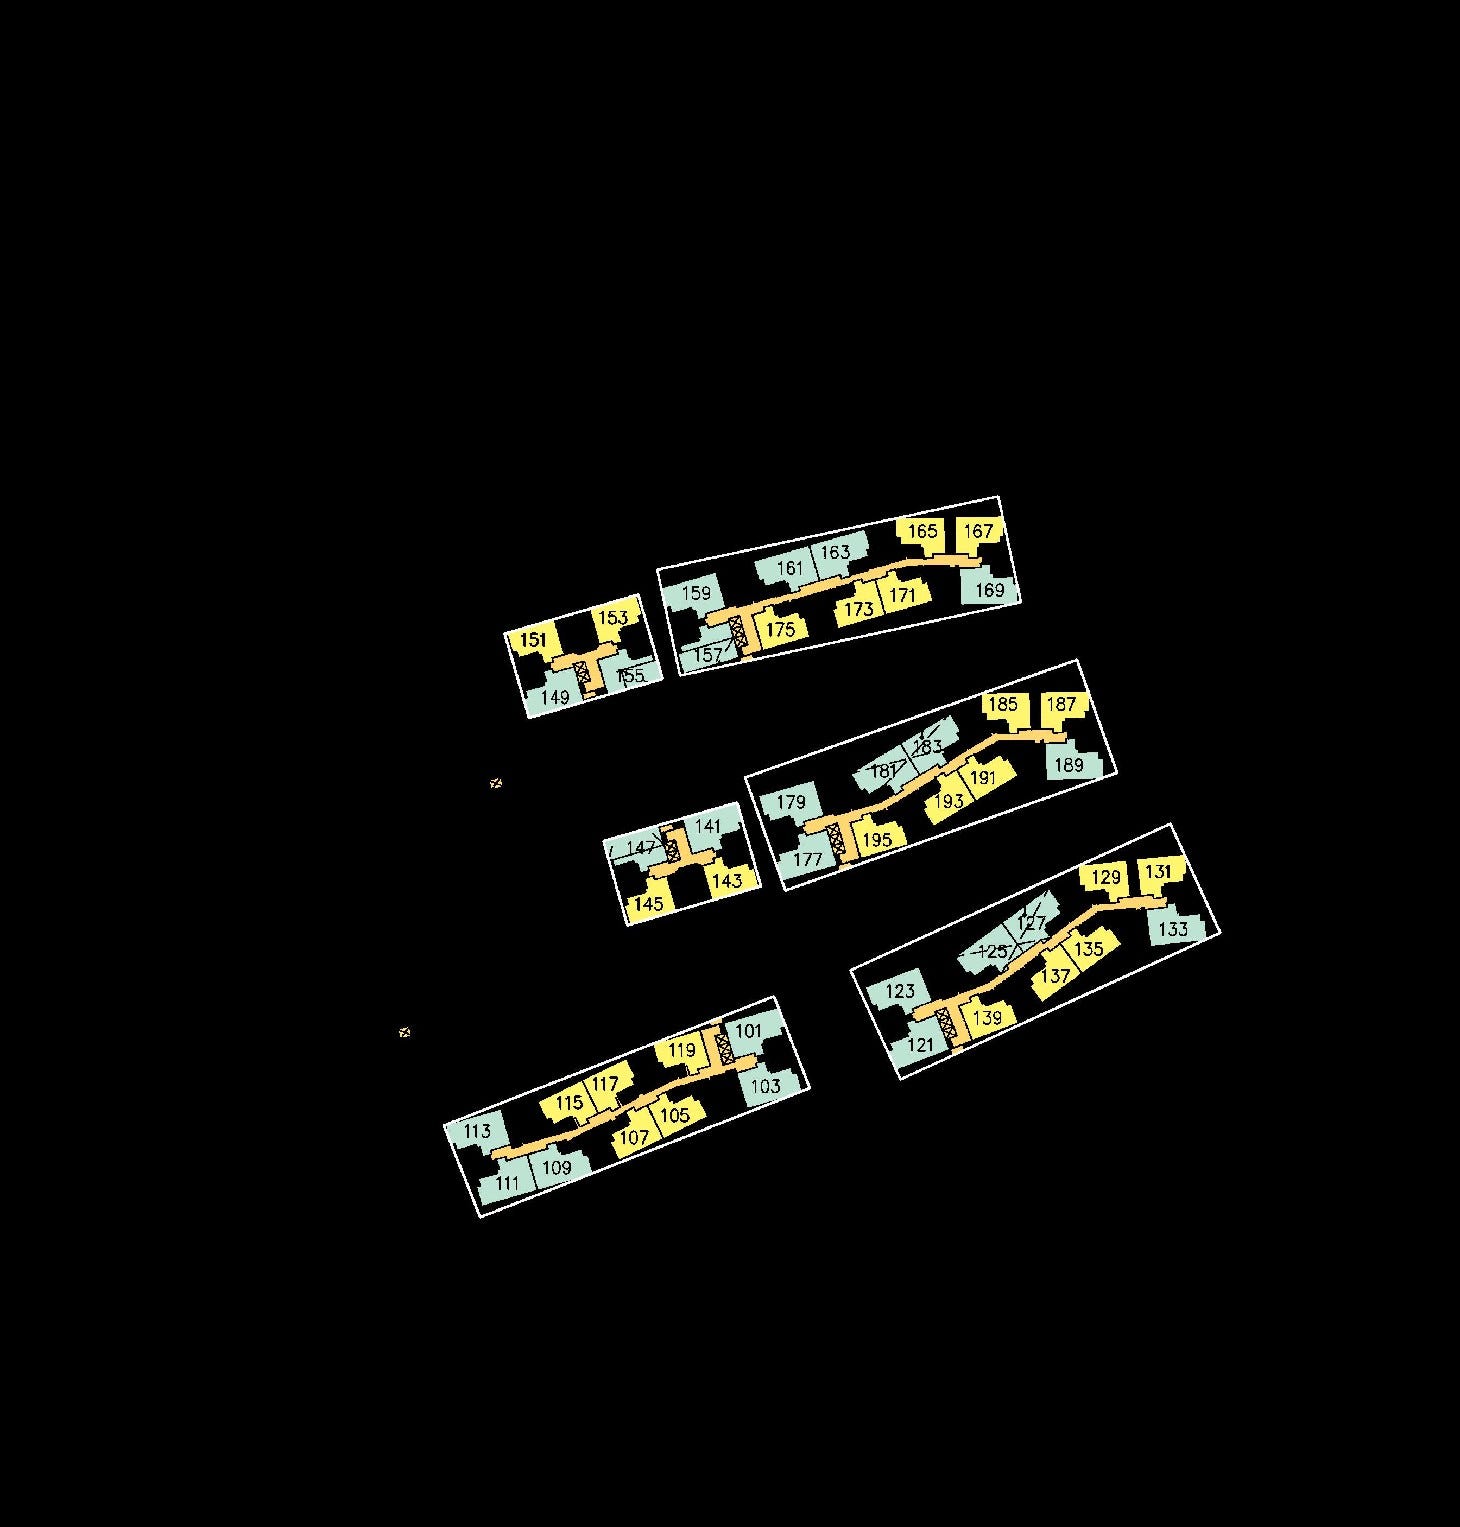
Site Plan with Color Segmented for 5-Room units
Looks awesome! However, this still does not give us the exact position of each 5-Room unit yet. Therefore, we will have to use another technique called contour detection. For this technique, we will first convert the image to grayscale. This means the image only contains 1 channel. We then apply a simple threshold to convert all pixels with value 127 and above to 255 and pixels below 127 to 0. Finally, we use findContours function in OpenCV to detect where are units.
# convert image to grayscale
imgray = cv2.cvtColor(img, cv.COLOR_BGR2GRAY)
# apply threshold
thresh = cv2.threshold(imgray, 127, 255, 0)[1]
# find contours
contours, hierarchy = cv.findContours(thresh, cv2.RETR_TREE, cv2.CHAIN_APPROX_SIMPLE)
# draw contours on image
cv2.drawContours(img, contours, -1, (0, 255, 0), 3)
And our image will start to look like this:

Contours drawn around all 5-Room units
We can also convert our contours (many points) into rectangles (4 points) for the ease of computation while retaining the information we want.
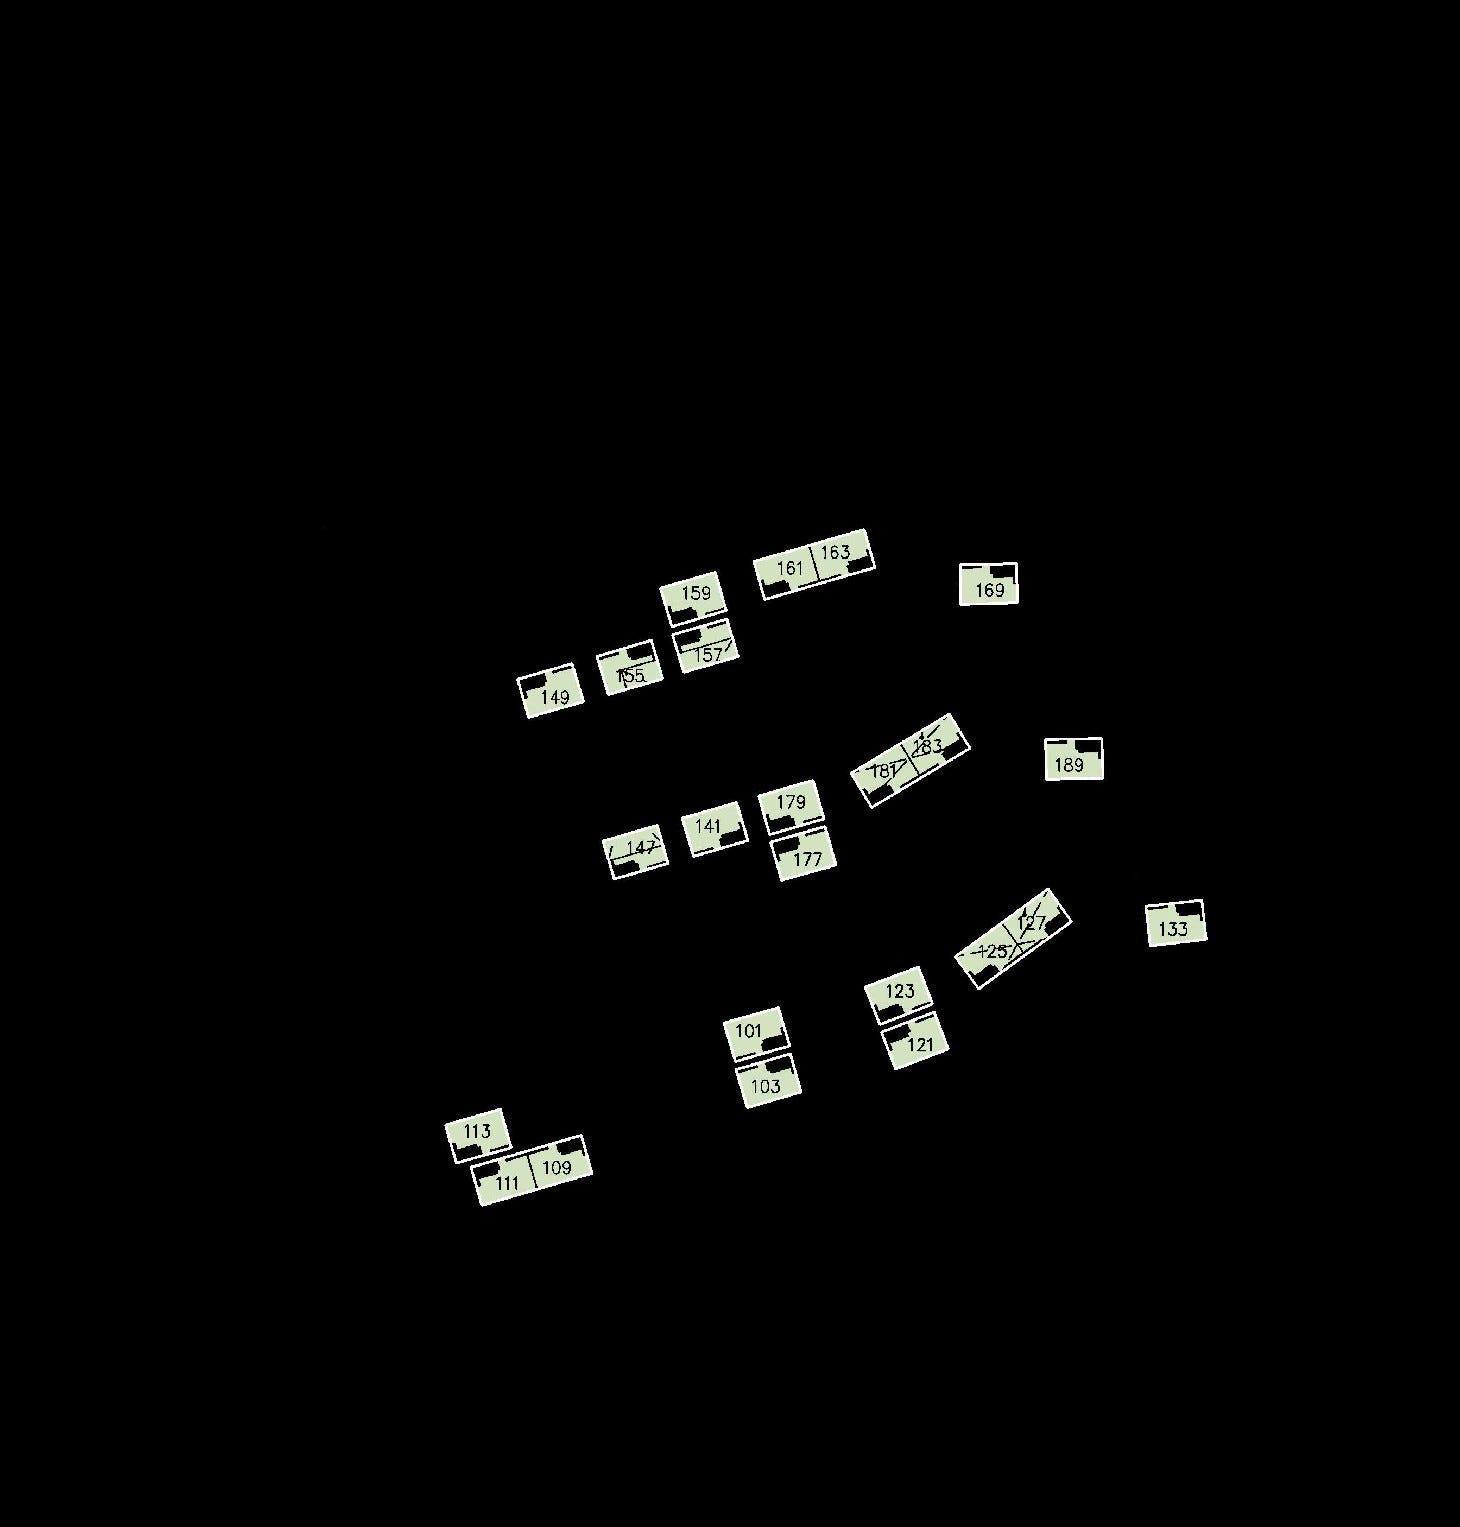
Contours converted to Bounding Box using cv2.minAreaRect(contour)
There we go, we now have the coordinates of each 5-room unit in our site plan! Moving on to our second objective:
For each unit, determine which side the windows are located on.
By looking at the layout of a 5-room flat, we determine that the windows are on the flatter end of the ‘rectangle’.
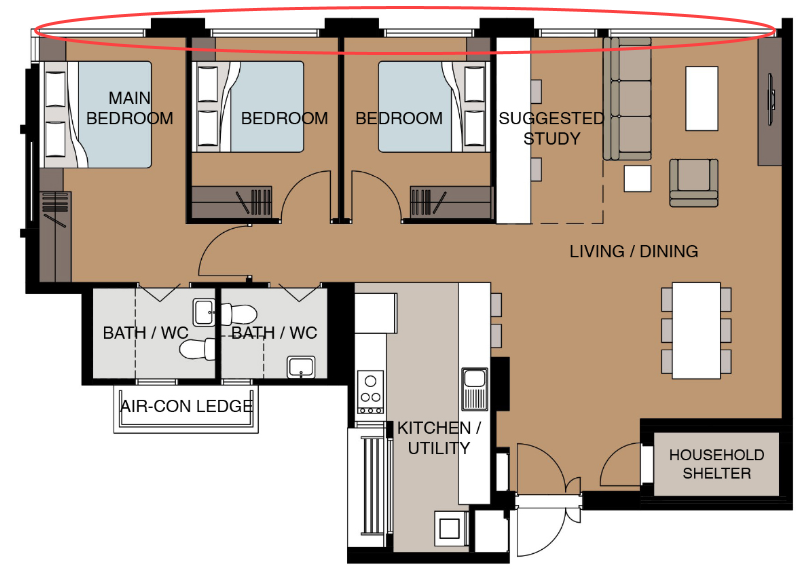
Layout of a 5-room unit. Photo by HDB
In order to determine the orientation of the unit, we can tap on another common technique in image processing called [template matching](https://opencv-python-tutroals.readthedocs.io/en/latest/py_tutorials/py_imgproc/py_template_matching/py_template_matching.html). The main idea about template matching is using a template (duh) and sliding it over our base image. The position that gives you the minimum difference is likely to contain your template.
Instead of sliding, we have to rotate the template 90 degrees each time and repeat it with a flipped template. This is to account for the ways our units can appear in their bounding boxes. In total, we have 8 different orientations to compare with and obtain the minimum difference.
# load base image and template
img = cv2.imread(sample_img_path, 0)
template = cv2.imread(template_path, 0)

# canny edge detection to get edges of base image
edged = cv2.Canny(img, 50, 200)

# define the orientations
methods_arr = [('original',0), ('original',90), ('original',180), ('original',270),
              ('flipped',0), ('flipped',90), ('flipped',180), ('flipped',270)]

for method in methods_arr:
    template_copy = template.copy()
    if method[0] == 'flipped':
        # flips image
        template_copy = cv2.flip(template, 1)

    # rotates image
    template_copy = rotate_image(template_copy, method[1])
    # perform template matching
    result = cv2.matchTemplate(edged, template_copy, cv2.TM_SQDIFF)
    # get maximum and minimum distance => we focus on minimum distance
    (_, maxVal, _, maxLoc) = cv2.minMaxLoc(result)
Here’s a short example of what it does:
Template (Left) with varying orientation and Base Image (Right)
The orientation that gives the minimum difference is the best match. Using that orientation, we can determine which two points of our bounding box coordinates are the flatter side of the rectangle. Therefore, leading us to our third objective:
For each unit, determine which direction the windows are facing.
This is rather straightforward without having to use any techniques. By calculating the average point of the bounding box and the average point of the two points on the side of the window, we can project a line to indicate which direction the window is facing.

Direction of which the windows are facing
Application
With the coordinates of the bounding boxes and direction of the window, we can now build factors (features) on top of them. Continuing our example, we would like to determine the type of sun each unit will be facing.
Animation of sun movement. Animation by Stacked Homes
A unit has morning sun if the windows face East, afternoon sun if the windows face West **and indirect sun if the windows face **North/South. As North is also the north of the site plan, we can determine the angle and compass direction of our windows by calculating the angle between two lines. The first line is the blue arrow drawn above and second line is simply a vertical line. The formula for angle between two lines is:
Photo by Steemit

A simple rule-based approach can help convert compass direction into type of sun a unit will face. For example, [NNW, N, NNE, SSW, S, SSE] will be indirect sun, [E, ENE, ESE, NE, SE] will be morning sun and [W, WNW, WSW, NW, SW] will be afternoon sun.
Another factor we can calculate is whether a unit’s view is blocked and if so, how far till the view is blocked? By performing color segmentation for every other room type, we can obtain the bounding box of ‘obstacles’ around each unit.
Bounding box of each block
Remember our blue arrow (window direction)? Now let’s project it further in the same direction until it hits one of these boxes, which is the same as finding the intersection between a line and a rectangle.
One neat trick is to determine the point of the intersection between the line and each of the 4 lines that form the rectangle. If it intersects, we can draw a green arrow to indicate blockage and calculate its length:
Projection of window direction and potential view blockage
To determine the actual distance, we can make reference to the scale in the original map for the ratio between distance on a map and the corresponding distance on the ground.
Finally, we can put everything together into a simple spreadsheet to allow easy referencing and filtering according to our preferences:
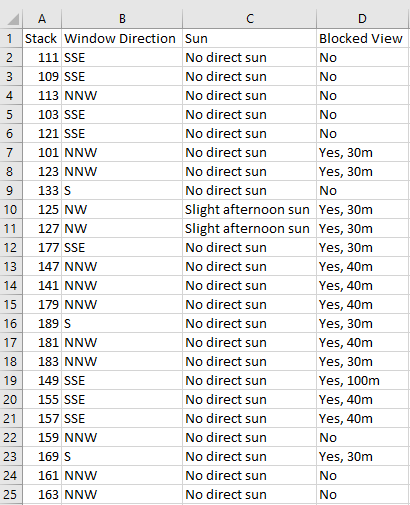
Summary of 5-Room units with factors
Given that most factors revolve around positioning of the units, you can expand further on the factors and build a fairly comprehensive list. However, I decided to focus on these 3 factors as a proof-of-concept and to gather feedback on its usability.
Conclusion
Even though this eventually took much longer than the couple of days I saved, it was definitely worthwhile considering the time it will save for future homeowners. In fact, it has already been integrated into BTO Buddy (the bot from Part 1). Lastly, I hope you enjoyed this article as much as I did working on the project. All feedback is greatly appreciated, cheers!
Disclaimer: You might find the whole process not as smooth sailing as described (so is life) and require small hacks, such as dilation and dilution of images, to make it work successfully.